
I recently spent 15 days in Honduras, bringing Feed My Starving Children meals to remote villages, distributing solar lanterns, doing construction at an orphanage, and more. Connecting to those back home and sharing the work we were doing was important. While my normal phone service provider offered international roaming in Honduras, the price they wanted was a bit much and the local provider they utilized lacked decent service and fast LTE data. Here’s how to get cellphone service in Honduras with fast data speeds and a low price.
Cellphone Service In Honduras
Before traveling abroad, you need to make sure your phone is unlocked. Some phones come unlocked, but most will require a request to your phone provider to unlock if you’ll be traveling. Here are links to more information on unlocking your phone with AT&T, Verizon, Sprint, and T-Mobile. You can also call your service provider, tell them you’ll be traveling to Honduras, and request they unlock your phone.
Once in Honduras, here are the steps you need to take.
1) Acquire A Pre-Paid SIM Card
Most people in Honduras have pre-paid phone service, rather than monthly-billed. SIM cards and phone refills are sold everywhere, from gas stations to countless little stores connected to people’s homes. You’ll see the Tigo and Claro logos all over the place and finding a card shouldn’t be an issue. Some of the shops in the airport sell them and they cost very little. I paid just L30.00 for mine (which equated to about $1.30 USD at the time).
Honduras has 2 major cellphone service providers. Tigo covers a large portion of the country, while Claro also has a large coverage area. After talking with some locals, I found that Tigo has better coverage in most areas, so you may want to keep that in mind when choosing a provider. Tigo also provides you with 100MB of data free to get started, which makes it even easier as you don’t need to get on wifi. I’d go with Tigo, unless you can only find a Claro SIM.
Pop out your old SIM card (be sure to keep it, you’ll need to reinstall it when you head home) and install the new prepaid SIM in your phone. If you’re unsure of how to do so, search for a guide online before you leave home. You may need a paperclip or pin to eject it, so make sure you pack one.
2) Activate Your Account
Once the SIM is installed, you may see some screens pop up in Spanish. Tap the Si (Yes) button to accept, until you’re back to your normal home screen. You should then see your service provider icon (in the upper corner of your screen) display the pre-paid provider name.
Launch the App Store and search for the Tigo app. There is one for each country they provide service in, so make sure you select the right one. You can save yourself some time by downloading it before you leave home.

Launch the app and you will be prompted for your phone number. This is the Honduras phone number assigned to your SIM card and should have been written on the card the SIM came attached to or with the paperwork it included. Honduras numbers are two groups of four digits, so they’ll look something like XXXX-XXXX. Enter it and you should receive an activation confirmation text message after a couple minutes.
If you aren’t prompted for your phone number after launching the app, tap the ‘Mi número:‘ area in the upper left of the app and then enter your number.
While you’re waiting for the confirmation message, you can check out the price for various data packages. You can purchase talk time too, though I’d suggest using FaceTime or Skype. Then you only need to spend your money on data.
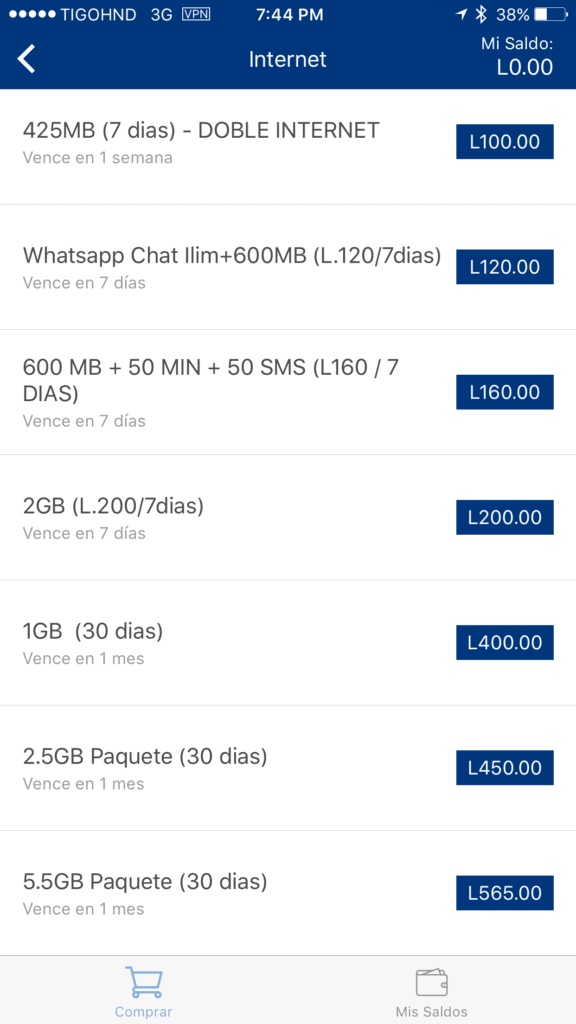
Tap ‘Comprar’ in the bottom left corner of the app and then tap Internet to view the data packages. Note not only the amount of data but also how long before it expires (‘Vence en X días’ is how many days it’s good for). Many of the lesser packages last only 7 days. If you’ll be there longer, you may want to look at one of the larger options as they have a 30 day expiration date. I went with the 5.5GB option as it was only about $25 USD and let me allow everyone I was traveling with to tether and use my data.
Once you’ve received the message that things are activate, you can add money to your account and buy the package you want.
3) Add Money To Your Account
With your account activated, you now need to add money to it in order to buy data or talk time.
There are a number of services that allow you to easily recharge your account. I used Recharge.com but MobileRecharge.com works too. A simple search for “Recharge Honduras” along with the service provider name should give you a number of options.
Tigo has what’s called triple saldo. This means that on certain days of the week, your recharge money is tripled. They do this based on the ending digit of your phone number. Generally, numbers ending in 0 or 1 on Monday, 2 or 3 on Tuesday, 4 or 5 on Wednesday, 6 or 7 on Thursday, 8 on Friday, and 9 on Saturday. Some may want to wait for this day to recharge, but given how cheap it is in the first place, it generally makes more sense to just buy the package you want now, rather than waiting.
Enter your phone number (the Honduras number, not the one back home) and the amount you’d like deposit into your account. You’ll be charged an additional dollar and some change for the recharge processing fee. Most of the recharge services accept major credit cards and PayPal.
Once you’ve made your payment, you should receive confirmation of the credit to your account via text message after just a few minutes.
4) Purchase Your Package
Now that you’ve got credit, you can buy your data package.
In the Tigo app you can tap the round arrow on the ‘Mis Saldos‘ screen and it’ll refresh your balance. Confirm you got credited what you paid for, then head to the Comprar section of the app.
Select the package you want by tapping the price then tap ‘Comprar’ to confirm. Tap ‘Cancelar‘ to cancel, should you happen to select the wrong package.
After purchasing the package, it should be credited to your account immediately. Now you’re all set to surf the web.
Additional Insight
Getting cellphone service in Honduras is easy and inexpensive. By following the quick guide above you can have full access abroad without the crazy costs of international plans. Enjoy the trip!